Tag Cloud

CRM 2011 (161) CRM 4.0 (144) C# (116) JScript (109) Plugin (92) Registry (90) Techpedia (77) PyS60 (68) WScript (43) Plugin Message (31) Exploit (27) ShellCode (26) FAQ (22) JavaScript (21) Killer Codes (21) Hax (18) VB 6.0 (17) Commands (16) VBScript (16) Quotes (15) Turbo C++ (13) WMI (13) Security (11) 1337 (10) Tutorials (10) Asp.Net (9) Safe Boot (9) Python (8) Interview Questions (6) video (6) Ajax (5) VC++ (5) WebService (5) Workflow (5) Bat (4) Dorks (4) Sql Server (4) Aptitude (3) Picklist (3) Tweak (3) WCF (3) regex (3) Config (2) LINQ (2) PHP (2) Shell (2) Silverlight (2) TSql (2) flowchart (2) serialize (2) ASHX (1) CRM 4.0 Videos (1) Debug (1) FetchXml (1) GAC (1) General (1) Generics (1) HttpWebRequest (1) InputParameters (1) Lookup (1) Offline Plug-ins (1) OutputParameters (1) Plug-in Constructor (1) Protocol (1) RIA (1) Sharepoint (1) Walkthrough (1) Web.config (1) design patterns (1) generic (1) iframe (1) secure config (1) unsecure config (1) url (1)

Pages

Thursday, April 18, 2013

MSCRM Form Types

CRM Form Types

  • Is the user creating a new record: crmForm.FormType == 1
  • Is the user updating an existing record: crmForm.FormType == 2
  • Is the user unable to update this record: crmForm.FormType == 3
  • Is this record deactivated: crmForm.FormType == 4
  • Is the user using the Quick Create form: crmForm.FormType == 5
  • Is the user using the Bulk Edit form: crmForm.FormType == 6
  • What is the unique ID for this record: crmForm.ObjectId
  • What type of record is this: crmForm.ObjectTypeCode
  • What type of record is this (Entity Name): crmForm.ObjectTypeName
  • Is the user using the Outlook Client: crmForm.IsForOutlookClient == true
  • Is the user using the Outlook Light Client: crmForm.IsForOutlookLightClient == true
  • Is the user working On-line: crmForm.IsOnline == true
  • Have any fields in this form been changed: crmForm.IsDirty == true

HTTP Status Codes for REST

REST is a style of development for exposing data in such a way that it is easy to consume, easy to produce and makes use of HTTP.
REST is not a replacement for SOAP or WS* but an alternative to solve certain problems better

HTTP Status Code

Changing the title of a CRM form

This script will change the name of CRM form

document.title = "Hello World!";

Asp.Net Chart Demo

using System;
using System.Collections.Generic;
using System.Linq;
using System.Web;
using System.Web.UI;
using System.Web.UI.WebControls;
using System.Web.UI.DataVisualization.Charting;

namespace ChartDemo
{
public partial class Default : System.Web.UI.Page
{
protected void Page_Load(object sender, EventArgs e)
{
// Note: The HttpHandler used to generate the image must be registered in Web.config

// Populate the chart with datasource
//crt.DataSource = new List
//{
// new Person { Name = "Pete", Age = 40 },
// new Person { Name = "Lois", Age = 40 },
// new Person { Name = "Chris", Age = 15 },
// new Person { Name = "Meg", Age = 13 },
// new Person { Name = "Stewie", Age = 2 }
//};

// Bind the data to the control
// crt.DataBind();

//Create a new List
List ls = new List();
ls.Add("abc");
ls.Add("xyz");
ls.Add("mno");

List li = new List();
li.Add(5);
li.Add(7);
li.Add(3);


crt.DataSource = new List
{
new Person { Name = "Adam", Age = 90 },
new Person { Name = "Lois", Age = 40 },
new Person { Name = "Chris", Age = 15 },
new Person { Name = "Megrath", Age = 13 },
new Person { Name = "Evie", Age = 2 },
new Person { Name = "Adam1", Age = 80 },
new Person { Name = "Lois1", Age = 50 },
new Person { Name = "Chris1", Age = 25 },
new Person { Name = "Megrath1", Age = 30 },
new Person { Name = "Evie1", Age = 20 }
};
crt.DataBind();

crt.Series[0].Points[0].AxisLabel = "point0";
crt.Series[0].Points[1].AxisLabel = "point1";
crt.Series[0].Points[2].AxisLabel = "point2";
crt.Series[0].Points[3].AxisLabel = "point3";


}

}

class Person
{
public string Name { get; set; }
public int Age { get; set; }
}
}

Microsoft Dynamics CRM 4.0 webinars

Hello and welcome to Microsoft Dynamics CRM 4.0 screencast.
Here we are going to explore some of the basics of Dynamics CRM 4.0
Enjoy the show!

Introduction to Microsoft Dynamics CRM


Microsoft Dynamics CRM 4.0 Overview


Microsoft Dynamics CRM 4.0 Deep Dive


Microsoft Dynamics CRM 4.0 Custom Development


Microsoft Dynamics CRM 4.0 as a Platform


Microsoft Dynamics CRM 4.0 Workflows


Microsoft Dynamics CRM 4.0 Reporting


Microsoft Dynamics CRM 4.0 Report Wizard


Microsoft Dynamics CRM 4.0 Installation


Microsoft Dynamics CRM 4.0 Multi-Currency


Microsoft Dynamics CRM 4.0 Multi-Language


Microsoft Dynamics CRM 4.0 Data Migration Manager


Microsoft Dynamics CRM 4.0 Office Communication Server


Microsoft Dynamics CRM 4.0 Advanced Find


Microsoft Dynamics CRM 4.0 Import Data Wizard


Microsoft Dynamics CRM 4.0 Duplicate Detection


Microsoft Dynamics CRM 4.0 Security


Microsoft Dynamics CRM 4.0 Multitenancy


Download

Consuming a WCF service


Adding references to WCF services is trivially easy with Visual Studio 2008, but if you're still working with 2005 there are a few things that need to be considered when referencing WCF services instead of using Add Web Reference

The following step-by-step is meant to help particularly those who have not developed WCF services but just need to consume them.  It applies to both, VS 2005 and VS 2008.

Prerequisite installs for Visual Studio 2005

If you are in a library, console, or Windows forms project, you should be seeing an Add Service Reference item in your project's context menu. If you don't see this, you are missing some prerequisites. Download and install the following packages:

  1. .NET Framework 3.0 Redistributable
    These are the libraries that contain the WCF namespaces, such as System.ServiceModel and System.Runtime.Serialization. This package also contains WF and WPF runtime libraries.
  2. Visual Studio 2005 "Orcas" Extensions
    The WCF and WPF (Windows Presentation Foundation) extensions that enable IDE integration into Visual Studio 2005.
  3. .NET Framework 3.0 SP1

You should not have to install the Windows SDK (it's a huge download) to enable IDE integration, even if the Extensions install complains that it's not present. Ignore this message if you are only interested in consuming WCF services.

VS 2005 web site projects

In Visual Studio 2005, you will not see an Add Service Reference command in web site projects, even after installing above prerequisites.  Apparently this was an oversight and didn't quite make it into the Extensions CTP release, because VS 2008 has this option.  To work around this you have two options:

  • Create a class library project, add it to your solution, and create your service references there. You will need to transfer generated app.config sections to your web.config (see below). 
  • Generate your proxy classes and configurations using svcutil.exe utility, and include the generated files in the web site project.
Adding the Service Reference
  1. Test the service from your web browser. Navigate to the .svc file. If everything checks out, copy the URL from the Address bar.
  2. Right-click on the project in the Solution Explorer window and choose Add Service Reference. In VS 2005, you'll see the following dialog.
    Add Service Reference Dialog
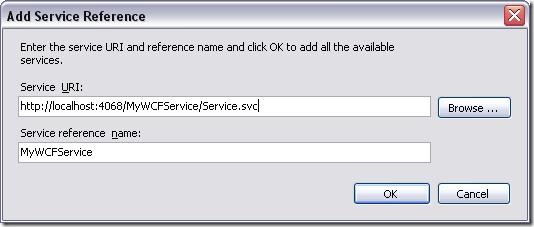
  3. Enter (paste) the URL to your service's .svc file. (.svc?wsdl works as well)
  4. Give the service a short but descriptive name. This will become a part of your proxy class' namespace (more about that later).

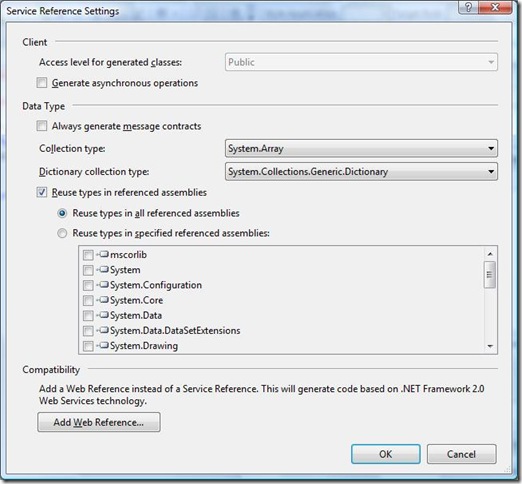
In VS 2008, you see more a bit more information about the service, plus you get a lot more control over generated data types through the Advanced options dialog:
Ref2008_Advanced

This will generate several files. What files are generated differs between VS 2005 and VS 2008, and between non-web and web projects in VS 2008. Essentially you will come out of this operation with a proxy class and some configuration values.

The client proxy class

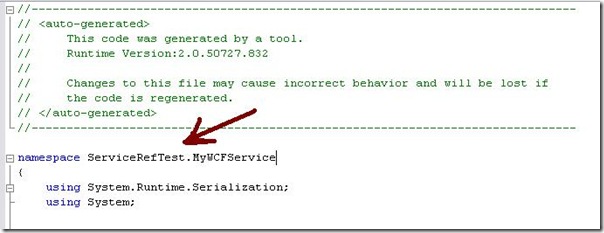
When you expand the tree under the service reference, you'll find a .cs file (VS 2005) that contains your proxy class. Note that it adopted the root namespace of the project it was generated in. I mention this because this is an important difference from how .asmx references were created, and also from how svcutil.exe creates your proxy.

proxy namespace

To instantiate the proxy class, use the following naming pattern:


ProjectRootNamespace.ServiceReferenceName.ServiceNameClient myServiceClient =
               new ProjectRootNamespace.ServiceReferenceName.ServiceNameClient("EndpointConfigurationName");


Notice the class name ends in Client.  Where do you get the EndpointConfigurationName from?  Glad you asked. Read on...

Configuration considerations

Besides generating a proxy class, Visual Studio's also writes a section into your .config file when you Add a Service Reference. This section is bounded by


<system.serviceModel>  </system.serviceModel>


tags. If you generated the proxy in a class library project, you will have to copy this section to the executing assembly project's .config file. 

appconfig

One of the nice advantages of using a service reference over a web reference is that you have complete control over the channel stack, security, protocols, etc. through configuration. The generated configuration mimics the service's configuration on the server. The things to understand are:


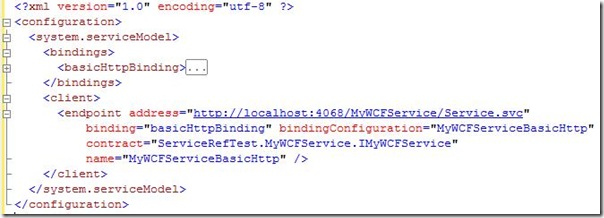
  • Endpoints, in the <client> node, consist of an Address, a Binding and a Contract.  A service can expose multiple endpoints, but since you are pointing your reference tool at a specific endpoint, and not the service directly, you will only ever get one from the tool. The endpoint has a name, which you need when instantiating a the client proxy (so EndpointConfigurationName above would be replaced with MyWCFServiceBasicHttp in this example).
  • The Binding defined in the <bindings> node defines the communication patterns. It is referenced by the endpoint with the bindingConfiguration attribute.
  • The Contract defined by a fully qualified interface name. Notice that the namespace is NOT the namespace defined in the service, but the one your proxy class resides in. This may be confusing especially if you also developed the service.  If you instantiate your proxy class with above example, you don't need to care about the interface .

Again, remember to copy these sections into the executing assembly's .config file!

Updating a service reference

If the service implementation changes without data- or service contract (method signature) changes, you don't need to do anything at the client. If the contract or address has changed, however, you need to re-generate your proxy and may need to update your configuration. This can also be done through the IDE. 


  • Right-click on the reference in Solution Explorer and choose Update Service Reference.
    This will also replace the .config section, regardless of server config changes or not. If you made config changes in your client config, be aware that you may end up with double entries with names such as MyWCFServiceBasicHttp1 (to use the example above). You should clean those up, or you will end up with a holy mess after a while.

If your service moved, or you want to test, say, the staging or production service, the procedure differs between VS2005 and 2008:


  • VS2005:  Open the  .map file under the service reference. It looks something like this:
    map file
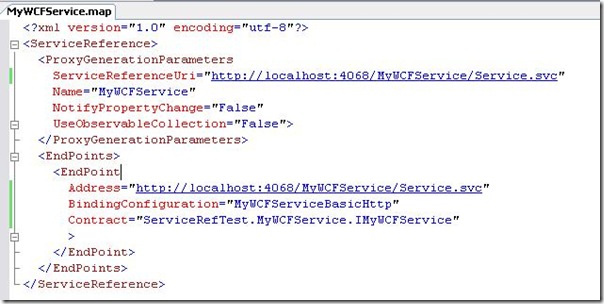
    Edit the ServiceReferenceUri only, and save the .map file, and Update Service Reference as before.  You will see the EndPoint Address change automatically as the service is contacted, a new proxy is generated and the .config file is updated.
  • VS2008:  Right-click the reference in Solution Explorer and choose Configure Service Reference.  You will see the Service Reference Settings dialog (see above). Change the Address value, click OK, and everything that needs to happen happens.

Remember again, to copy the config section into your executing assembly if you are operating in a class library.

Using svcutil.exe

You can do all the above and more using the command line tool, svcutil.exe.  In VS2005, this may be your best option if you want to establish service references in a web site project.

Note that the tool resides in different locations for the different VS versions:


  • VS2005: C:\Program Files\Microsoft Visual Studio 8\Common7\IDE\
  • VS2008: C:\Program Files\Microsoft SDKs\Windows\v6.0A\Bin\

Open a command prompt, navigate to your project directory, and use this simple command line to generate a proxy and config:


"C:\Program Files\Microsoft Visual Studio 8\Common7\IDE\svcutil.exe" http://localhost:4068/MyWCFService/Service.svc /out:MyWCFService.cs


This is the basic command line, you may want to investigate into other options for lots more control. For more information see http://msdn2.microsoft.com/en-us/library/aa347733.aspx.

Configurations will be written into an output.config file. CAUTION: If you use the /config switch, do not directly reference your application configuration file, as it will be overwritten. If you had other config sections, you have just lost them. The VS IDE is much smarter about diffing the .config files first.

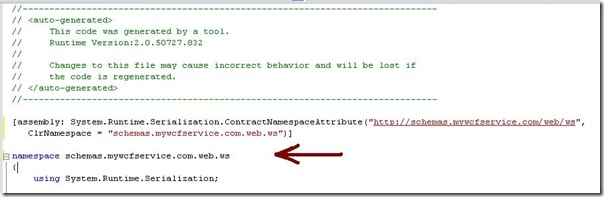
Notice that the namespace of the generated proxy class is based on the service's namespace if you don't specify it explicitly through the commandline.

svcutil_namespace

Include the proxy class in your project (in a web project, in your app_code folder), and copy the config sections into the executing assembly config ... done!

CRM4: Using the Form onLoad Event to Default Task Values


Using the Form onLoad Event to Default Task Values

Summary: This code example will highlight some of the customization features in Microsoft CRM 4.0 including:

  • Activity customization
  • Client-side programming model (form and field events)

When creating a new task, we know that customers frequently want to make the following changes to the default form:

  • Change the default duration from 30 minutes to blank.
  • Auto-populate today’s date into the Due Date field.

These two changes might seem simple at first, but digging deeper into the details of these two fields reveals some obstacles to make these changes. Because the Duration field looks like a picklist field, you would expect to be able to just change the default value by editing the Duration attribute of the Task entity. However, even though the Duration field appears to be a picklist, it is actually a special field used on various activities in Microsoft CRM. For these special fields, you can not set a default value (or add picklist values) like you can for normal picklist fields.

In addition to the Duration field nuance, DateTime attribute data types do not have a default value. Since the Due Date field uses the DateTime data type, we can’t use the attribute editor to specify today’s date as the default value in the Due Date field. Hence, we now have two issues to solve regarding the customer requests.

Despite the two problems we just outlined, we can easily meet the customer’s request to change the default task form by leveraging the form OnLoad event of the task entity’s form.

To accomplish this we will add a simple script to the form OnLoad event and Microsoft CRM will run our script everytime a user opens the task form. When it runs, our script will programmatically change the value of the Duration and Due Date fields to the values we specify.

The only other issue we need to address with our script is to make sure that we only change the Duration and Due Date values when users create a new task. Obviously, we wouldn’t want to change the Due Date and Duration values when users open previously created tasks. When we’re done, every time a user creates a new task, our scripts will set the Duration to blank and then default today’s date as the due date. The flow chart for this customization looks like the following:

Now we’ll walk through how you would actually setup, test and deploy this code.

Procedure: Using the Form OnLoad Event to Default Task Duration and Due Date


1.
Navigate to Settings -> Customization -> Customize Entities. Double click the Task entity. The entity editor will appear.

2.
Click Forms and Views. Double click Form. The form editor for the task entity will appear.

3.
Click Form Properties and the editor window will appear. From here, you see that you can choose to add a script to the form
OnLoad or OnSave event.

As we previously discussed, we want to use the OnLoad event so that the script runs when users open a form.

4.
Select OnLoad and click Edit. The Event Detail Properties window will appear. In this window, enter the following code:

	var CRM_FORM_TYPE_CREATE = 1;										
var CRM_FORM_TYPE_UPDATE = 2;

switch (crmForm.FormType)
{
case CRM_FORM_TYPE_CREATE:
crmForm.all.actualdurationminutes.DataValue = null;
crmForm.all.scheduledend.DataValue = new Date();
break;

case CRM_FORM_TYPE_UPDATE:
// do nothing
break;
}

A quick review of this code shows that Microsoft CRM allows us to programmatically set the values on the form using
javascript. This code sets the actualdurationminutes field (the schema name for Duration) to NULL, which means the same
as blank. It also sets the scheduledend field (the schema name for Due Date) to today’s date using the javascript Date( )
function. The OnLoad event will run this script everytime a user opens a form, but remember we only want to set the default
values when users create a new task. Therefore, we added the cases so that our script only runs for the form type of 1.
Microsoft CRM assigns a form type value to each form (1-Create, 2-Update, 3-Read Only, etc.) so that you can tie this
information into your scripts just like we needed in this example. In this script, if the form type is 2 that indicates
it is an update form so we don’t alter the Due Date and Duration field values.

5.
After you enter the code, click the Event is enabled checkbox. This box indicates whether or not Microsoft CRM should run
your script when it fires the OnLoad event. The screen should look like this:

6.
Next we’ll setup the Dependencies related to our code to make sure that no one accidentally removes the Duration or
Due Date field from the task form (because our script would generate an error if those fields were missing).
Click the Dependencies tab.

7.
You’ll see two columns: Available Fields and Dependent Fields. The Available Fields column lists all of the fields that appear
on the task form. To make Due Date and Duration Dependent Fields, select those values in the left column and then click
the ">>" button. Microsoft CRM will move those fields into the Dependent Fields column.

Click OK.

8.
Click Ok. You should be back on the task form editor now.

9.
Next we want to use the form preview feature to test the code we just added. Before you try preview, make sure you save the
changes you made by clicking the Save button.

10.
To test the script on the create form, click Preview -> Create Form and you should see the following:

You’ll see that the Duration picklist defaults to a blank value, and the Due Date field displays today’s date and time!

11.
If you try testing your script on the update form using Preview -> Update Form, you’ll see that the Due Date field does not
default to today’s date just like we expect (because our script only runs on Create forms). However, you might notice
that the Duration field appears blank. When you use the Update Form preview Microsoft CRM shows you an update of a blank
record so it will always show picklists as blank, just like it does for the Priority picklist on the task form. So the
script ran correctly, but the fact that Microsoft CRM shows an update of a blank record might causes some little nuances
like the blank picklists.

12.
Now that you tested the script and it works correctly, you’re ready to publish. To publish the task entity, return to the
entity editor and click Actions -> Publish in the top tool bar.

13.
That’s it, you’re done!

This example showed how you to tap into the form OnLoad event to manipulate field values before users see the form. Even if you didn’t understand the syntax of this code example, you should understand the concepts of how you can highly customize your forms by adding custom scripts that tie into Microsoft CRM form events.

Of course, this example just shows a very simple tweak to the task form, but you can get very creative with additional custom code and the powerful programming model of Microsoft CRM 4.0.

Adding additional values to duration fields

The following script adds the new option "42 Minutes" to the actualdurationminutes field in a task:

var duration = crmForm.all.actualdurationminutesSelect;

var tables = duration.getElementsByTagName("table");
var table = tables[1];

var row = table.insertRow();
var newOption = row.insertCell(-1);

var newValue = "42 Minutes";
newOption.setAttribute("val", newValue);
newOption.innerText = newValue;

Replacing the content of an IFRAME

If you really want to do some funny things in your CRM form, you can create an IFRAME serving as a placeholder for your real HTML code. Create an IFRAME in an entity and name it "IFRAME_TEST". In the Onload event put the following code:

crmForm.all.IFRAME_TEST_d.innerHTML ="Some HTML text";

Note the "_d" at the end of IFRAME_TEST. This single line replaces the whole IFRAME element with your own HTML.