Tag Cloud

CRM 2011 (161) CRM 4.0 (144) C# (116) JScript (109) Plugin (92) Registry (90) Techpedia (77) PyS60 (68) WScript (43) Plugin Message (31) Exploit (27) ShellCode (26) FAQ (22) JavaScript (21) Killer Codes (21) Hax (18) VB 6.0 (17) Commands (16) VBScript (16) Quotes (15) Turbo C++ (13) WMI (13) Security (11) 1337 (10) Tutorials (10) Asp.Net (9) Safe Boot (9) Python (8) Interview Questions (6) video (6) Ajax (5) VC++ (5) WebService (5) Workflow (5) Bat (4) Dorks (4) Sql Server (4) Aptitude (3) Picklist (3) Tweak (3) WCF (3) regex (3) Config (2) LINQ (2) PHP (2) Shell (2) Silverlight (2) TSql (2) flowchart (2) serialize (2) ASHX (1) CRM 4.0 Videos (1) Debug (1) FetchXml (1) GAC (1) General (1) Generics (1) HttpWebRequest (1) InputParameters (1) Lookup (1) Offline Plug-ins (1) OutputParameters (1) Plug-in Constructor (1) Protocol (1) RIA (1) Sharepoint (1) Walkthrough (1) Web.config (1) design patterns (1) generic (1) iframe (1) secure config (1) unsecure config (1) url (1)

Pages

Friday, April 19, 2013

WCF Architecture

The following figure illustrates the major components of WCF.

 050000_WCF-Architecture

Figure 1: WCF Architecture

Contracts

Contracts layer are next to that of Application layer. Developer will directly use this contract to develop the service. We are also going to do the same now. Let us see briefly what these contracts will do for us and we will also know that WCF is working on message system.

Service contracts

- Describe about the operation that service can provide. Example, Service provided to know the temperature of the city based on the zip code, this service we call as Service contract. It will be created using Service and Operational Contract attribute.

Data contract

- It describes the custom data type which is exposed to the client. This defines the data types, are passed to and from service. Data types like int, string are identified by the client because it is already mention in XML schema definition language document, but custom created class or datatype cannot be identified by the client e.g. Employee data type. By using DataContract we can make client aware that we are using Employee data type for returning or passing parameter to the method.

Message Contract

- Default SOAP message format is provided by the WCF runtime for communication between Client and service. If it is not meeting your requirements then we can create our own message format. This can be achieved by using Message Contract attribute.

Policies and Binding

- Specify conditions required to communicate with a service e.g security requirement to communicate with service, protocol and encoding used for binding.

Service Runtime

- It contains the behaviors that occur during runtime of service.

  • Throttling Behavior- Controls how many messages are processed.
  • Error Behavior - Specifies what occurs, when internal error occurs on the service.
  • Metadata Behavior - Tells how and whether metadata is available to outside world.
  • Instance Behavior - Specifies how many instance of the service has to be created while running.
  • Transaction Behavior - Enables the rollback of transacted operations if a failure occurs.
  • Dispatch Behavior - Controls how a message is processed by the WCF Infrastructure.
Messaging

- Messaging layer is composed of channels. A channel is a component that processes a message in some way, for example, by authenticating a message. A set of channels is also known as a channel stack. Channels are the core abstraction for sending message to and receiving message from an Endpoint. Broadly we can categories channels as

  • Transport Channels

    Handles sending and receiving message from network. Protocols like HTTP, TCP, name pipes and MSMQ.

  • Protocol Channels

    Implements SOAP based protocol by processing and possibly modifying message. E.g. WS-Security and WS-Reliability.

Activation and Hosting

- Services can be hosted or executed, so that it will be available to everyone accessing from the client. WCF service can be hosted by following mechanism

  • IIS

    Internet information Service provides number of advantages if a Service uses Http as protocol. It does not require Host code to activate the service, it automatically activates service code.

  • Windows Activation Service

    (WAS) is the new process activation mechanism that ships with IIS 7.0. In addition to HTTP based communication, WCF can also use WAS to provide message-based activation over other protocols, such as TCP and named pipes.

  • Self-Hosting

    WCF service can be self hosted as console application, Win Forms or WPF application with graphical UI.

  • Windows Service

    WCF can also be hosted as a Windows Service, so that it is under control of the Service Control Manager (SCM).

Using Dynamic Entities

This sample shows how to create, retrieve, and update a contact as a dynamic entity.


   1:  //# Using Dynamic Entities 

   2:  using System;

   3:  using System.Collections;

   4:   

   5:  using CrmSdk;

   6:  using Microsoft.Crm.Sdk.Utility;

   7:   

   8:  namespace Microsoft.Crm.Sdk.HowTo

   9:  {

  10:     /// <summary>

  11:     /// This sample shows how to create a contact with a DynamicEntity and

  12:     ///  retrieve it as a DynamicEntity.

  13:     /// </summary>

  14:     public class DynamicEntityHowTo

  15:     {

  16:        static void Main(string[] args)

  17:        {

  18:           // TODO: Change the server URL and organization to match your Microsoft

  19:           // Dynamics CRM Server and Microsoft Dynamics CRM organization.

  20:           DynamicEntityHowTo.Run("http://localhost:5555", "CRM_SDK");

  21:        }

  22:   

  23:        public static bool Run(string crmServerUrl, string orgName)

  24:        {

  25:           bool success = false;

  26:   

  27:           try

  28:           {

  29:              // Set up the CRM Service.

  30:           CrmService service = CrmServiceUtility.GetCrmService(crmServerUrl, orgName);

  31:   

  32:              #region Setup Data Required for this Sample

  33:   

  34:              // Create the account object.

  35:              account account = new account();

  36:              account.name = "Fourth Coffee";

  37:   

  38:              // Create the target object for the request.

  39:              TargetCreateAccount target = new TargetCreateAccount();

  40:              target.Account = account;

  41:   

  42:              // Create the request object.

  43:              CreateRequest createRequest = new CreateRequest();

  44:              createRequest.Target = target;

  45:           

  46:              // Execute the request.

  47:              CreateResponse createResponse = (CreateResponse)service.Execute(createRequest);

  48:              Guid accountID = createResponse.id;

  49:   

  50:              #endregion

  51:   

  52:              #region Create Contact Dynamically

  53:   

  54:              // Set the properties of the contact using property objects.

  55:              StringProperty firstname = new StringProperty();

  56:              firstname.Name = "firstname";

  57:              firstname.Value = "Jesper";

  58:              StringProperty lastname = new StringProperty();

  59:              lastname.Name = "lastname";

  60:              lastname.Value = "Aaberg";

  61:           

  62:              // Create the DynamicEntity object.

  63:              DynamicEntity contactEntity = new DynamicEntity();

  64:   

  65:              // Set the name of the entity type.

  66:              contactEntity.Name = EntityName.contact.ToString();

  67:   

  68:              // Set the properties of the contact.

  69:              contactEntity.Properties = new Property[] {firstname, lastname};

  70:        

  71:              // Create the target.

  72:              TargetCreateDynamic targetCreate = new TargetCreateDynamic();

  73:              targetCreate.Entity = contactEntity;

  74:   

  75:              // Create the request object.

  76:              CreateRequest create = new CreateRequest();

  77:   

  78:              // Set the properties of the request object.

  79:              create.Target = targetCreate;

  80:   

  81:              // Execute the request.

  82:              CreateResponse created = (CreateResponse) service.Execute(create);

  83:           

  84:              #endregion

  85:           

  86:              #region Retrieve Contact Dynamically

  87:   

  88:              // Create the retrieve target.

  89:              TargetRetrieveDynamic targetRetrieve = new TargetRetrieveDynamic();

  90:   

  91:              // Set the properties of the target.

  92:              targetRetrieve.EntityName = EntityName.contact.ToString();

  93:              targetRetrieve.EntityId = created.id;

  94:   

  95:              // Create the request object.

  96:              RetrieveRequest retrieve = new RetrieveRequest();

  97:   

  98:              // Set the properties of the request object.

  99:              retrieve.Target = targetRetrieve;

 100:              // Be aware that using AllColumns may adversely affect

 101:              // performance and cause unwanted cascading in subsequent 

 102:              // updates. A best practice is to retrieve the least amount of 

 103:              // data required.

 104:              retrieve.ColumnSet = new AllColumns();

 105:   

 106:              // Indicate that the BusinessEntity should be retrieved as a DynamicEntity.

 107:              retrieve.ReturnDynamicEntities = true;

 108:   

 109:              // Execute the request.

 110:              RetrieveResponse retrieved = (RetrieveResponse) service.Execute(retrieve);

 111:   

 112:              // Extract the DynamicEntity from the request.

 113:              DynamicEntity entity = (DynamicEntity)retrieved.BusinessEntity;

 114:   

 115:              // Extract the fullname from the dynamic entity

 116:              string fullname;

 117:   

 118:              for (int i = 0; i < entity.Properties.Length; i++)

 119:              {

 120:                 if (entity.Properties[i].Name.ToLower() == "fullname")

 121:                 {

 122:                    StringProperty property = (StringProperty) entity.Properties[i];

 123:                    fullname = property.Value;

 124:                    break;

 125:                 }

 126:              }

 127:   

 128:              #endregion

 129:   

 130:              #region  Update the DynamicEntity

 131:   

 132:              // This part of the example demonstrates how to update properties of a 

 133:              // DynamicEntity.  

 134:   

 135:              // Set the contact properties dynamically.

 136:              // Contact Credit Limit

 137:              CrmMoneyProperty money = new CrmMoneyProperty();

 138:   

 139:              // Specify the property name of the DynamicEntity.

 140:              money.Name="creditlimit"; 

 141:              money.Value = new CrmMoney();

 142:   

 143:              // Specify a $10000 credit limit.

 144:              money.Value.Value=10000M; 

 145:   

 146:              // Contact PreferredContactMethodCode property

 147:              PicklistProperty picklist = new PicklistProperty();

 148:   

 149:              //   Specify the property name of the DynamicEntity. 

 150:              picklist.Name="preferredcontactmethodcode"; 

 151:              picklist.Value = new Picklist();

 152:   

 153:              //   Set the property's picklist index to 1.

 154:              picklist.Value.Value = 1;

 155:   

 156:              // Contact ParentCustomerId property.

 157:              CustomerProperty parentCustomer = new CustomerProperty();

 158:   

 159:              //   Specify the property name of the DynamicEntity.

 160:              parentCustomer.Name = "parentcustomerid"; 

 161:              parentCustomer.Value = new Customer();

 162:   

 163:              //   Set the customer type to account.

 164:              parentCustomer.Value.type = EntityName.account.ToString();

 165:   

 166:              //   Specify the GUID of an existing CRM account.

 167:              // SDK:parentCustomer.Value.Value = new Guid("A0F2D8FE-6468-DA11-B748-000D9DD8CDAC");

 168:              parentCustomer.Value.Value = accountID; 

 169:   

 170:              //   Update the DynamicEntities properties collection to add new properties.

 171:              //   Convert the properties array of DynamicEntity to an ArrayList.

 172:              ArrayList arrProps = new ArrayList(entity.Properties);

 173:              

 174:              //   Add properties to ArrayList.

 175:              arrProps.Add(money);

 176:              arrProps.Add(picklist);

 177:              arrProps.Add(parentCustomer);

 178:   

 179:              //   Update the properties array on the DynamicEntity.

 180:              entity.Properties = (Property[])arrProps.ToArray(typeof(Property));

 181:   

 182:              // Create the update target.

 183:              TargetUpdateDynamic updateDynamic = new TargetUpdateDynamic();

 184:   

 185:              // Set the properties of the target.

 186:              updateDynamic.Entity = entity;

 187:   

 188:              //   Create the update request object.

 189:              UpdateRequest update = new UpdateRequest();

 190:   

 191:              //   Set request properties.

 192:              update.Target = updateDynamic;

 193:   

 194:              //   Execute the request.

 195:              UpdateResponse updated = (UpdateResponse)service.Execute(update);

 196:              

 197:              #endregion

 198:   

 199:              #region check success

 200:   

 201:              if (retrieved.BusinessEntity is DynamicEntity)

 202:              {

 203:                 success =  true;

 204:              }

 205:   

 206:              #endregion

 207:     

 208:              #region Remove Data Required for this Sample

 209:   

 210:              service.Delete(EntityName.contact.ToString(), created.id);

 211:              service.Delete(EntityName.account.ToString(), accountID);

 212:   

 213:              #endregion

 214:           }

 215:           catch (System.Web.Services.Protocols.SoapException ex)

 216:           {

 217:              // Add your error handling code here...

 218:              Console.WriteLine(ex.Message + ex.Detail.InnerXml);

 219:           }

 220:           

 221:           return success;

 222:        }

 223:     }

 224:  }

Upload an Attachment

The following code example shows how to upload attachment to an annotation entity instance. The code first creates an account entity instance, and then adds an attached note to it with a doc file as an attachment.


using System;
using System.Collections.Generic;
using System.Text;
using System.IO;
using Microsoft.Crm.Sdk.Utility;

namespace Microsoft.Crm.Sdk.HowTo
{
// Use the following Microsoft Dynamics CRM namespaces in the sample.
using CrmSdk;

class UploadAttachment
{
static void Main(string[] args)
{
// TODO: Change the server URL and organization to match your
// Microsoft Dynamics CRM Server and Microsoft Dynamics CRM Organization.
UploadAttachment.Run("http://localhost:5555", "CRM_Organization");
}

public static bool Run(string crmServerUrl, string orgName)
{
#region Setup Data Required for this Sample

bool success = false;

#endregion

try
{
// Set up the CRM Service.
CrmService service = CrmServiceUtility.GetCrmService(crmServerUrl, orgName);
service.PreAuthenticate = true;

// Create an account object.
account acct = new account();

// Set the account properties.
acct.accountnumber = "CRM102";
acct.name = "Fourth Coffee";
acct.address1_name = "Primary";
acct.address1_line1 = "1234 Elm Street";
acct.address1_city = "Redmond";
acct.address1_stateorprovince = "WA";
acct.address1_postalcode = "54199";

// Creates an account in the Crm.
Guid createdAccountId = service.Create(acct);

// Now create the annotation object.
annotation note = new annotation();
note.notetext = "This is a sample note";
note.subject = "Test Subject";
note.objectid = new Lookup();
note.objectid.type = EntityName.account.ToString();

// Sets the note's parent to the newly created account.
note.objectid.Value = createdAccountId;
note.objecttypecode = new EntityNameReference();
note.objecttypecode.Value = EntityName.account.ToString();

// Create the note.
Guid createdNoteId = service.Create(note);

#region Setup Additional Data Required for this Sample

// Now convert the attachment to be uploaded to Base64 string.
// This will create a doc file in the current folder of executable.
string currentPath = System.Environment.CurrentDirectory.ToString();
TextWriter tw = new StreamWriter(currentPath + "\\Crm" + createdNoteId.ToString() + ".doc");
// Write a line of text to the file.
tw.WriteLine("This document is for testing an attachment upload feature of CRM 4.0.");
tw.Close();

#endregion

// Open a file and read the contents into a byte array.
FileStream stream = File.OpenRead(currentPath + "\\Crm" + createdNoteId.ToString() + ".doc");
byte[] byteData = new byte[stream.Length];
stream.Read(byteData, 0, byteData.Length);
stream.Close();

// Encode the data using base64.
string encodedData = System.Convert.ToBase64String(byteData);

// Now update the note.
annotation updateNote = new annotation();
updateNote.annotationid = new Key();
// Set the Note ID that is being attached to.
updateNote.annotationid.Value = createdNoteId;
updateNote.documentbody = encodedData;
updateNote.filename = "Crm" + createdNoteId.ToString() + ".doc";
updateNote.mimetype = @"application\ms-word";
service.Update(updateNote);

#region check success

if (createdNoteId != Guid.Empty)
{
success = true;
}

#endregion


#region Remove Data Required for this Sample

if (createdNoteId != Guid.Empty)
service.Delete(EntityName.annotation.ToString(), createdNoteId);

if(createdAccountId != Guid.Empty)
service.Delete(EntityName.account.ToString(), createdAccountId);

if (File.Exists(currentPath + "\\Crm" + createdNoteId.ToString() + ".doc"))
File.Delete(currentPath+"\\Crm" + createdNoteId.ToString() + ".doc");

#endregion

}
catch (System.Web.Services.Protocols.SoapException err)
{
string strError = String.Format("An error occurred. The message is {0}. The detail is {1}.", err.Message, err.Detail.OuterXml.ToString());
}


return success;
}
}
}


CRM 4.0 Service Utility Class

CRM 4.0 service utility classs


// Classes to create Metadata Service & CRM Service
using System;
using System.Collections.Generic;
using System.Text;
using CrmSdk;
using MetadataServiceSdk;
 
namespace Microsoft.Crm.Sdk.Utility
{
   public class CrmServiceUtility
   {
      public static CrmService GetCrmService()
      {
         return GetCrmService(null, null);
      }
 
      public static CrmService GetCrmService(string organizationName)
      {
         return GetCrmService(null, organizationName);
      }
 
      /// <summary>
      /// Set up the CRM Service.
      /// </summary>
      /// <param name="organizationName">My Organization</param>
      /// <returns>CrmService configured with AD Authentication</returns>
      public static CrmService GetCrmService(string crmServerUrl, string organizationName)
      {
         // Get the CRM Users appointments
         // Setup the Authentication Token
         CrmSdk.CrmAuthenticationToken token = new CrmSdk.CrmAuthenticationToken();
         token.OrganizationName = organizationName;
      
         CrmService service = new CrmService();
 
         if (crmServerUrl != null &&
            crmServerUrl.Length > 0)
         {
            UriBuilder builder = new UriBuilder(crmServerUrl);            
            builder.Path = "//MSCRMServices//2007//CrmService.asmx";
            service.Url = builder.Uri.ToString();
         }
 
         service.Credentials = System.Net.CredentialCache.DefaultCredentials;
         service.CrmAuthenticationTokenValue = token;
 
         return service;
      }
 
      /// <summary>
      /// Set up the CRM Metadata Service.
      /// </summary>
      /// <param name="organizationName">My Organization</param>
      /// <returns>MetadataService configured with AD Authentication</returns>
      public static MetadataService GetMetadataService(string crmServerUrl, string organizationName)
      {
         // Get the CRM Users appointments
         // Setup the Authentication Token
         MetadataServiceSdk.CrmAuthenticationToken token = new MetadataServiceSdk.CrmAuthenticationToken();
         token.OrganizationName = organizationName;
 
         MetadataService service = new MetadataService();
 
         if (crmServerUrl != null &&
            crmServerUrl.Length > 0)
         {
            UriBuilder builder = new UriBuilder(crmServerUrl);            
            builder.Path = "//MSCRMServices//2007//MetadataService.asmx";
            service.Url = builder.Uri.ToString();
         }
         
         service.Credentials = System.Net.CredentialCache.DefaultCredentials;
         service.CrmAuthenticationTokenValue = token;
 
         return service;
      }
      
      /// <summary>
      /// Create a Crm label
      /// </summary>
      /// <param name="label">string label value for LocLabel</param>
      /// <param name="langCode">Language Code for CrmLabel</param>
      /// <returns></returns>
      public static MetadataServiceSdk.CrmLabel CreateSingleLabel(string label, int langCode)
      {
         MetadataServiceSdk.CrmNumber crmNumber = new MetadataServiceSdk.CrmNumber();
         crmNumber.Value = langCode;
 
         MetadataServiceSdk.LocLabel locLabel = new MetadataServiceSdk.LocLabel();
         locLabel.LanguageCode = crmNumber;
         locLabel.Label = label;
 
         MetadataServiceSdk.CrmLabel crmLabel = new MetadataServiceSdk.CrmLabel();
         crmLabel.LocLabels = new MetadataServiceSdk.LocLabel[] { locLabel };
 
         return crmLabel;
      }
   }
 
 
}

Set up the CRM Service

This code snippets setups a Crm service provided the url & organization name
Add the following include files
using System;
using System.Collections.Generic;
using System.Text;
using CrmSdk;
using MetadataServiceSdk;


Create a CRMService

/// <summary>
      /// Set up the CRM Service.
      /// </summary>
      /// <param name="organizationName">My Organization</param>
      /// <returns>CrmService configured with AD Authentication</returns>
      public static CrmService GetCrmService(string crmServerUrl, string organizationName)
      {
         // Get the CRM Users appointments
         // Setup the Authentication Token
         CrmSdk.CrmAuthenticationToken token = new CrmSdk.CrmAuthenticationToken();
         token.OrganizationName = organizationName;
      
         CrmService service = new CrmService();
 
         if (crmServerUrl != null &&
            crmServerUrl.Length > 0)
         {
            UriBuilder builder = new UriBuilder(crmServerUrl);            
            builder.Path = "//MSCRMServices//2007//CrmService.asmx";
            service.Url = builder.Uri.ToString();
         }
 
         service.Credentials = System.Net.CredentialCache.DefaultCredentials;
         service.CrmAuthenticationTokenValue = token;
 
         return service;
      }

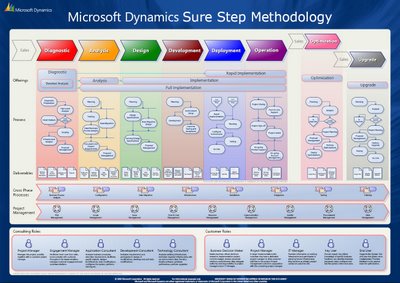
Sure Step Methodology An Overview

Microsoft Dynamics Sure Step provides partners, customers and Microsoft Consulting Services with end to end, business process flows that guide users through field-tested best practices, proven project management principles and user-friendly tools, enabling deployment, migration, configuration and upgrade of Microsoft Dynamics products.

Sure Step supports a broad range of products: Dynamics AX, Dynamics NAV, Dynamics GP, Dynamcis SL and Dynamics CRM. And different project types: Full Implementation, Rapid Implementation, Optimization and Upgrade. Products and project types can be combined. Microsoft provides the Sure Step Overview Diagram for sales and training situations.


Sure Step helps improve services’ delivery and efficiency so that increased profitability and customer satisfaction are achieved.This can be accomplished because Sure Step provides a consistent framework and a repeatable process that help improve the customer experience. All of this helps you hone the way you deploy Microsoft Dynamics solutions. Sure Step provides guidance for partners who support small, medium, and large implementations, including:

  1. Rapid project types on projects which primarily require a smaller implementation with little to no need for customization, typically in the small business    and lower mid market space.
  2. Standard project types on projects with more users and some customization required, typically for customers in the mid market space.
  3. Enterprise project types on projects for a large client with multiple sites and a large number of users, typically in the corporate account and enterprise   spaces.

Sure Step Methodology has six phases: Diagnostic, Analysis, Design, Development, Deployment & Operation. While Diagnostic is a pre-implementation phase, the Analysis through Operation phases represent the five phases of an implementation project. The Operation phase also encompasses post-implementation activities, in that it extends the project lifecycle beyond the implementation and into the Support stage.

Diagnostic Phase

The first phase in the Sure Step Methodology is the Diagnostic phase, which marks the transition from the sales cycle to implementation. The Diagnostic phase consists primarily of high-level planning and high-level analysis of the customer’s business processes and infrastructure. The goal of the Diagnostic phase is to collect information to define a high-level project scope and then create a customer proposal for the remaining phases of the implementation project.The Diagnostic phase consists of the following activities:

  1. Diagnostic preparation
  2. High-level analysis of business processes
  3. Detailed analysis of selected business processes (Optional)
  4. Project scoping
  5. Infrastructure analysis
  6. Project planning
  7. Proposal management

Analysis Phase

The activities in the Analysis phase help identify the decisions the customer must make that will guide the implementation.This phase is similar to Diagnostic in that work involves:
  1. Determining and documenting current business processes.
  2. Describing improved business processes
  3. Describing any modifications needed for the system to support future business processes.At the end of this phase, customers will have a good understanding of the proposed Microsoft Dynamics CRM  implementation. This includes the project cost, deliverables, and milestones.

The Analysis phase consists of the following activities:
  1.Planning
  2.Training
  3.Data migration
  4.Detailed analysis of business processes
  5.Document and present functional requirements
  6.Proposal management

Design Phase

Building on the deliverables created during Analysis, this phase consists of determining the design for the overall MS Dynamics implementation and designing solutions for specific customizations, integr-ations, and data migration needed to satisfy business requirements identified during the Analysis phase. The primary deliverables from this phase are a high-level design specification and a detailed technical design specification, both that satisfy the high-level decisions determined in the previous phases. These design specifications will guide the development activities in the following phase.

The  Design phase consists of the following activities:
1. Planning
2. Data migration design
3. Design specification
4. Technical design specification
5. Proposal management

Development Phase

The primary purpose of the Development phase is to develop the customizations,integrations, and data migration processes that were defined in the design specifications created and approved in the Design phase. The primary deliverables of development are the completed and tested customizations, reports, integrations, and any data migration programs and processes. Each component developed in this phase is tested and verified to be functioning as defined by the Functional requirements, design specifications, and testing criteria.An important feature of the Development phase is that development activities,such as individual features, integrations, or data migration, can continue through the Development phase at the same time. This depends on the size and complexity of the project and the number of resources available to work on individual components.The Development phase consists of the following activities and tasks:
1. Planning
2. Environment setup
3. Development
4. Customer testing and acceptance

Deployment Phase

The primary deliverable from the Deployment phase is a functioning live system.Activities in this phase prepare the infrastructure, application environment, and end-users for the cutover to the new system.
Activities in this phase include the following:
1. Preparing Go-Live plans, system test plans, and end-user training plans.
2. Configuring the live and test environments
3. Performing system testing and load testing using a subset of the customer’s data
4. Preparing and delivering end-user training
5. Completing final data migration and validation
6. Completing all Go-Live activities to launch the new systemFor rapid implementation projects, there is an additional activity at the beginning of the Deployment phase. Because rapid implementation projects go to deployment directly from the Diagnostic phase, you must complete additional activities to prepare for the deployment. After you complete those activities, a rapid deployment continues:The

Deployment phase consists of the following activities:
1. Rapid implementation
2. Planning
3. Environment configuration
4. Testing
5. Go-Live

Operation Phase

The primary purpose of the Operation phase is to support the customer technically and functionally during the initial Go-Live period for the new system.Additionally, you will perform tasks to close the project. At the end of the phase,you transition the project to the customer, and pursue the opportunity to provide on-going support and continued account management.

The Operation phase consists of the following activities:
1. Project closing
2. Post live support
3. Final acceptance sign-off
4. Project review
5. On-going product support
6. On-going account management

The Sure Step Methodology model also defines two additional phases that you can perform after a Microsoft Dynamics solution goes live in the customer’s production environment:

Optimization Phase

The Optimization phase is designed to provide structure to manage post Go-Live processes. This phase also provides an opportunity to maintain a relationship
with the customer after an initial implementation project or as a way to provide services to a new customer.The purpose of this phase is to review a customer’s existing Microsoft Dynamics implementation and adjust business processes, configuration, or performance to enhance the effectiveness of the solution. The Optimization phase mirrors a full implementation process because it encapsulates many of the same activities and tasks.The phase includes:
1. Analysis activities to gather information about process,configuration, and performance
2. Proposals for scope of work
3. The work to perform and deploy the optimization itself.

After completing the initial Analysis activities in the Optimization phase, you may determine that a full implementation approach is required to address the
customer’s issues.

An Optimization project consists of the following activities:
1. Analysis
2. Planning
3. Defining optimizations
4. Deploying optimizations
5. Operation

Upgrade Phase

The purpose of the upgrade phase is to upgrade a customer to a major new version of Microsoft Dynamics (upgrade projects are not intended for service
pack releases). Like an optimization project, an upgrade project consists of many similar activities performed in a full implementation project. This includes analysis, planning, testing, training, and upgrading the customer’s production environment.During the upgrade analysis activity, you may determine that the complexity of an upgrade requires a full implementation. This starts at the Diagnostic phase.An Upgrade project consists of the following activities:
1. Analysis
2. Planning
3. Performing the upgrade
4. Testing
5. Go-Live
6. Operation

CRM4:Launch on demand workflow

Sometimes we need to launch a workflow on a button click rather then selecting from the workflow menu. This is how to to do it in CRM 4.0. CRM has two hidden function to launch a workflow, but they have implementation for Form & Grid.

To call a workflow from a form button, we need to create a button in the form and call the javascript function launchOnDemandWorkflowForm

//when called from en***y form
launchOnDemandWorkflow(“”,ObjectTypeCode,Workflow ID)

//Example


launchOnDemandWorkflowForm("",10032,"{154599DD-B20B-4F72-8771-CA93C660C820


To call a workflow from a grid button, we need to create a button in the grid and call the javascript function launchOnDemandWorkflow

//when called from grid
launchOnDemandWorkflow('crmGrid',ObjectTypeCode,Wo rkflow ID)

//Example


launchOnDemandWorkflow(““,10032,"{154599DD-B20B-4F72-8771-CA93C660C820}");


We can also use the direct workflow dialog.Like


"/_grid/cmds/dlg_runworkflow.aspx?iObjType=1090&iTotal=1&wfId=% 7B15B4EB9B-5C68-46DE-8BFC-A0F4B0A29523%7d"


but you need to use CrmUrlEncode function to pass the values

CRM 4,2011:Autonumber using Workflow


This will work in CRM 4 and CRM 2011, although, for convenience, I’m doing it in the 2011 beta.

Current Auto-Numbering Options

The first option is for a limited set of entities which have auto-numbering out of the box.

image

For Contracts, Cases, Articles, Quotes, Orders, Invoices and Campaigns, auto-numbering can be set in the Administrative settings in CRM. The prefix for each of the entity numbers can be set and the final suffix can be of a length from four characters to six characters. A word of warning, if you change the length of the prefix, this changes for ALL the entities, not just the one you’re on.

For other entities, if you are using CRM 4, there is also an auto-numbering plugin available from codeplex.

http://crmnumbering.codeplex.com/

Of course, if you are using the online version of CRM 4 or CRM 2011, you will need to resort to another option. Here is one using workflow.

Step One: An Entity to Store the Current Incrementing Value

To store the current value of the incrementing value, we need a new entity. For this entity we create one record to hold the values.

image

In this case I’m storing the prefix and the suffix I am going to use for an incrementing value on the account record.

The record also needs to have 1:N relationship to the records it will increment. In this case, the Account entity.

Step Two: Set up the Field on the ‘Numbered’ Record

Account already has an ‘Account Number’ field so I will use this field to hold the value of the field.

Step Three: Set up the Workflows

I tried doing this with one workflow but for some reason the workflow could not link to the record with the values in it and then populate them. Therefore, I’m using two. The first workflow runs on the creation of the Account record and links to the record storing the increment values.

image

Incidentally, there is no need to add the lookup to the Account form as workflows can populate fields whether or not they have been added to the form. This is great when you need to store values but do not want to clutter the forms up.

The second one is triggered when the link to the value store record is populated. It does the populating of the Account record and also increments the value store by one so the next Account record gets a different suffix value.

image

For the Account Number, we add the two ‘slugs’ divided by a dash.

image

For the incrementing of the storing record, I use a little known trick which is available in both versions of CRM.

image

When you use the Form Assistant to populate a field, drop the ‘Set To’ Operator down and you will see a whole range of different operators available, depending on the field type. In the case of integer fields, one of the options is ‘Increment By’. By adding ‘1’ to the Default Value and hitting OK we tell the workflow to increment by 1 every time the workflow fires.

What We End Up With

After all this we end up with a process which will populate the Account Number of an Account with a unique value every time an Account record is created. As usual with workflows, this runs asynchronously. In other words, you will NOT see the field populating on the initial creation but rather only after you have saved and closed the record and reopened it a little time later, after the workflows have finished.

image

We can extend this to multiple entities by adding other fields to the store record and setting up additional 1:N relationships from the store record entity.

Changing the Link of a Ticker Symbol from MSN Money to Yahoo Finances

This is an unsupported solution as it requires modifications to server files! Open the following directory on your CRM server: C:\Inetpub\wwwroot\_forms\controls (may vary depending on your installation) Open the following file: INPUT.text.ticker.htc Search the following function:

function Launch()
{
if(value.length > 0)
{
Parse();

window.open("http://go.microsoft.com/fwlink?linkid=8506&Symbol=" +
encodeURIComponent(value), "", "height=" + (screen.availHeight * .75) +
",width=" + (screen.availWidth * .75) +
,scrollbars=1,resizable=1,status=1,toolbar=1,menubar=1,location=1");
}
}
Replace it with the following:
function Launch()
{
if(value.length > 0)
{
Parse();

//window.open("http://go.microsoft.com/fwlink?linkid=8506&Symbol=" +
encodeURIComponent(value), "", "height=" + (screen.availHeight * .75) +
",width=" + (screen.availWidth * .75) +
,scrollbars=1,resizable=1,status=1,toolbar=1,menubar=1,location=1");
window.open("http://finance.yahoo.com/q?s=" +
encodeURIComponent(value), "", "height=" + (screen.availHeight * .75) +
",width=" + (screen.availWidth * .75) +
",scrollbars=1,resizable=1,status=1,toolbar=1,menubar=1,location=1");
}
}
Save the file. On your client machine: Open Internet Explorer and remove all temporary internet files, so that the new htc source is retrieved. Navigate to any ticker symbol, enter a valid value and double click it.